
This post is part 2 in a 2 part series. Read Part 1: Personal Setup here.
Using text analysis for social science research can be a lot of work, but you can use container technology to set up your own advanced text analytics service in minutes.
In Part 1 of this two-part series, I described a way to analyze text by taking advantage of a simple Docker container running the Stanford CoreNLP service. However, at Urban, we don’t require researchers to set up the service on their own — our IT Department provides researchers with a shared text analysis platform in the cloud.
This post describes one relatively easy way to set this service up for your team or organization.
Your Options
At this point, I assume you’ve tested Stanford CoreNLP and are convinced it works, but are having trouble getting Docker to work on Windows 7 or your dataset is too large to process one at a time on a single computer. In this post, I give you a step-by-step guide on how to set up the Natural Language Processing (NLP) framework for your group or organization.
To demonstrate, I’m using Amazon Web Services’ (AWS) recently released Elastic Container Service Fargate offering. It is also possible to achieve a similar setup with the other services mentioned at the end of this post, especially if your organization maintains an existing container-based (or similar) environment internally or via another cloud provider.
Setting up a Service with AWS Fargate
Setting up AWS
If you haven’t done so already, your first step will be to sign up for Amazon Web Services. If you are signing up for personal use, this is fairly easy (you may already have a username and password if you’ve shopped on Amazon), though it’s a bit more involved for organizations. See Amazon’s step-by-step guide to opening and activating an account for more detail.
Setting up a Cluster
Now that you’ve got your AWS account, navigate to Amazon Elastic Container Service (ECS) and click on “Create Cluster”. Creating a cluster merely specifies a group of computers that you plan to use once you create a service with tasks running. Until the tasks you want the cluster to complete are defined and run under a service, you won’t pay for compute costs.
Some brief definitions:
Cluster: A group of computers working together that will run your service and make it accessible.
Task: The container (all the installed packages, files, etc.) that runs your service.
Service: Specifies how many tasks to run and what to do when usage of your application is high or low (scale up to more computers in the cluster, scale down to fewer computers in the cluster).
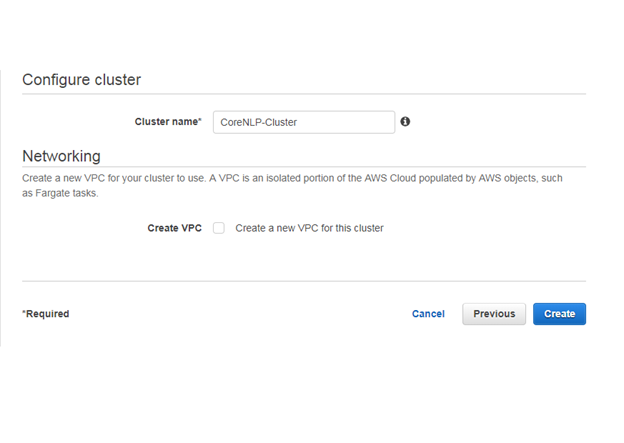
In the following screen, select the “Networking only” option (the box should say “Powered by AWS Fargate” at the bottom), and click “Next Step”. Give your cluster a name. In this case we’ll call it “CoreNLP-Cluster,” and click “Create”.
Setting up a Task
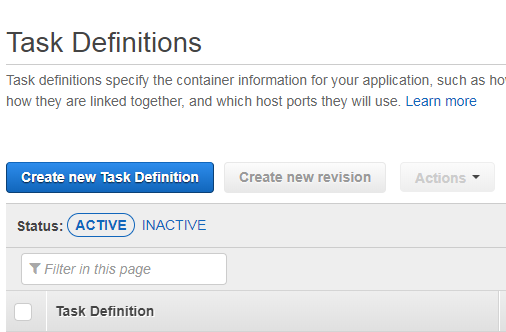
Your cluster is now ready for tasks and services to be defined. Don’t worry, you haven’t been billed yet as nothing is up and running. Next we need to define the task — our Natural Language Processing service — to run on the cluster. Click “View Cluster,” and on the top left of the screen, click “Task Definitions,” then “Create New Task Definition”. Select “Fargate,” then click “Next Step”.
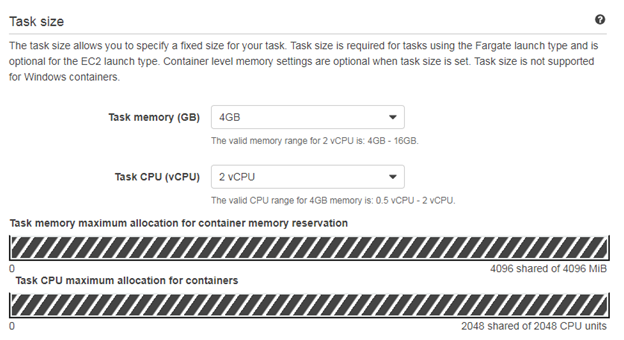
Give your task definition a name — in this case, we’ll call it “CoreNLP.” Leaving the remainder of settings as default, under “Task Size” select “4GB” task memory and “2 vCPU” task CPU. CoreNLP needs a significant amount of RAM and CPU capacity to quickly process requests, so changing these settings will affect performance. Under “Container Definitions”, click “Add Container”.
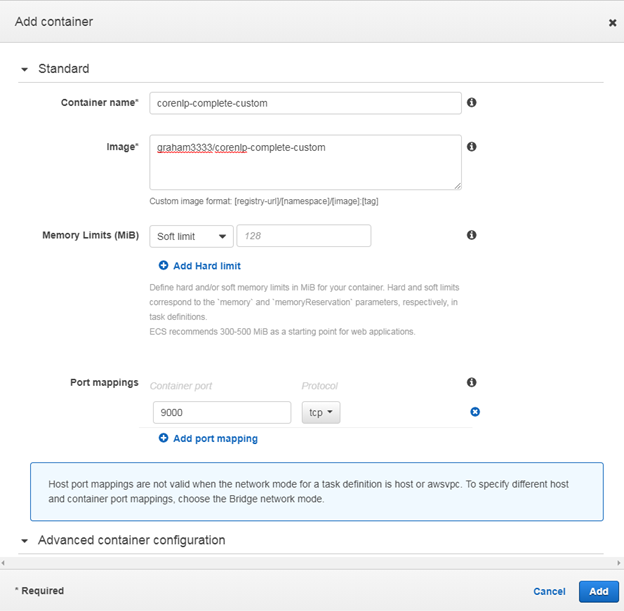
In the popup, fill in a container name — in this case, we’ll call it “corenlp-complete-custom” after the name of the underlying container — and our CoreNLP Docker image “graham3333/corenlp-complete-custom”. Under “Port Mappings,” enter “9000” under “Container Port” to map port 9000 in the container to the web service we’re creating, then click “Add” on the bottom right. When the popup closes, click “Create” to create the task, then “View Task Definition” to see your new task.
Tying it Together: Setting up a Service
Now that we have a cluster and a task, we need to set up a service to coordinate how to run the task. On the top left, click on “Clusters,” then at the bottom, click on your cluster name — in this case, “CoreNLP-Cluster”. At the bottom under the “Services” tab, click “Create”. Select Launch type “Fargate,” select your newly created task definition from the Task Definition drop down, and select your newly created cluster from the Cluster dropdown.

Give your service a name — in this case we’ll call it “CoreNLP-Service” — and set the number of tasks to one. This is the number of containers from the task definition you specified earlier. Leave the other defaults in place and click “Next Step”.
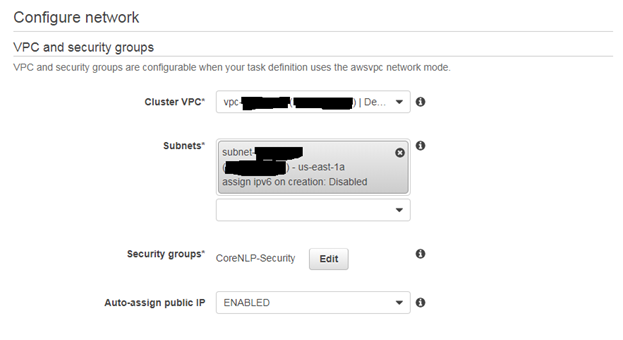
On the next page, for now select your “Default” VPC and then the first available subnet under that (you can change this later!), then click “Edit” next to “Security Groups”. In the popup, click “Add Rule,” under “Type” select “Custom TCP” (the second option), enter “9000” for the “Port Range.” (The pre-installed service in the container runs on port 9000, and opening up this port on the container allows you and others to access the service from your personal computers).
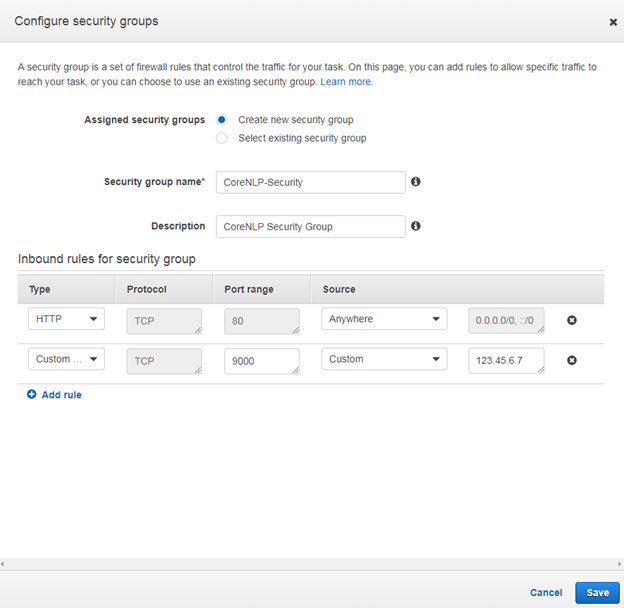
To restrict the service to just your computer or your company, in “Source” select “Custom”. Opening up a new browser tab, navigate to Google and search “My IP Address,” and copy the result to the “Source” field back in your AWS tab. To open the application to anyone (not ideal, as you’re paying for their service), select “Anywhere”. Click “Save” at the bottom right, then scroll to the bottom and click “Next Step”.
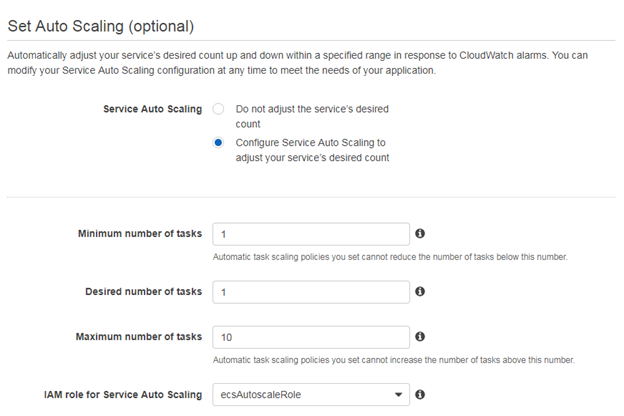
To ensure your service scales up with increased usage and down with inactivity, select “Configure Service Auto Scaling”. Select 1 under “Minimum Number of Tasks” and “Desired Number of Tasks”, and set some reasonable limit to the “Maximum Number of Tasks” according to your budget — here we’ll select 10.
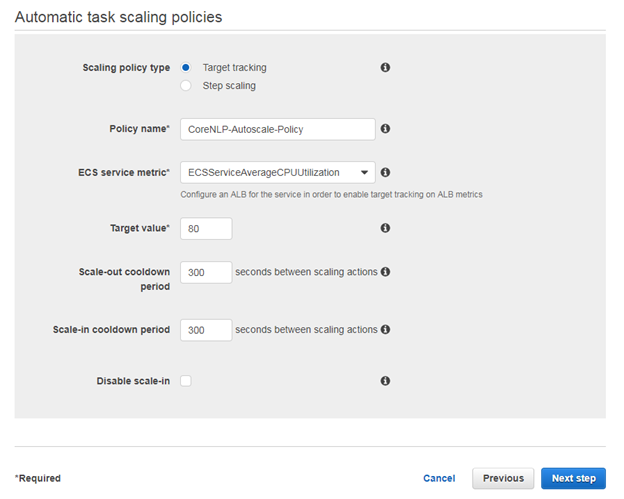
For demonstration purposes, we’ll use “Target Tracking,” which is a less flexible but simpler policy that allows you to set average CPU utilization. Once it rises above a certain amount, an additional task will be added. Give it a “Policy Name” — here we’ll use “CoreNLP-Target” and type “80” for the “Target Value” of CPU utilization. Leaving the other defaults in place, we’ll click “Next Step”, then “Create Service”. After a few seconds, the service should be created, and you can click “View Service”.
Your service should now be up and running! You are now being charged for its use, so be sure you understand the AWS ECS Fargate pricing details. With one task in this configuration, the total cost should come out in the hundreds of dollars per year, though with increased use, the costs could rise as more tasks are activated.
Testing
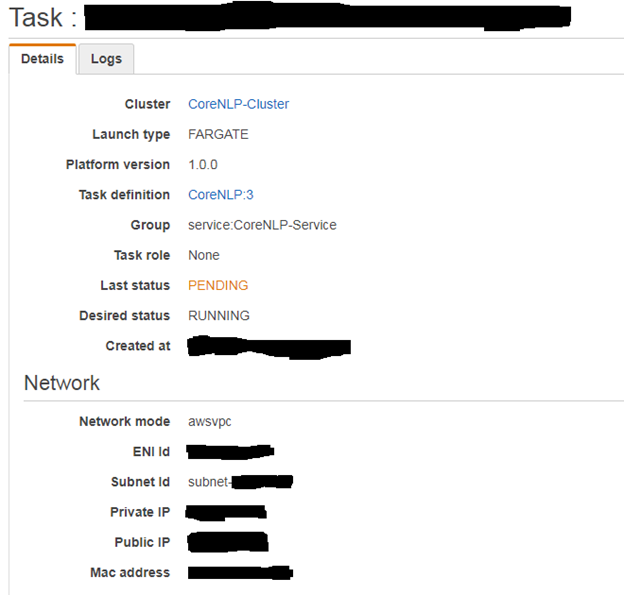
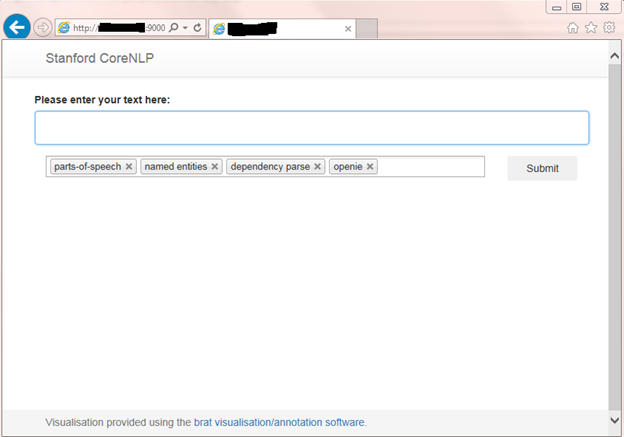
Under the “Tasks” tab, click the link of random letters and numbers that appears under “Task”, and copy the “Public IP” address. To test the service, go to the public IP address in your browser and add “:9000” to the end, or replace the “container_ip” variable with this IP address in the examples provided in Post 1 and run the example code.
Congratulations! You’ve now set up a shared advanced text analytics solution for you, your team, and your organization.
Other Options
A number of cloud service providers can provide you with a turnkey solution: Microsoft Azure Container Service, Google Cloud Platform App Engine or Kubernetes Engine, and Amazon Elastic Container Services, to name a few. These services allow you to deploy containers at scale, and manage the scale of the infrastructure behind the containers so that you have enough capacity to handle any volume of service at any time, avoiding the problem of buying physical machines and having “too much” or “too little” capacity.
Keep in mind that in Part 1, I mentioned that these same providers also have on-demand services that for smaller use cases may be more cost efficient for you and your organization. For example, Amazon Web Services has Amazon Comprehend, Google Cloud Platform has Cloud Natural Language, and Microsoft Azure has the Text Analytics API, all of which roughly charge between $1 to $5 dollars per 1,000 requests (though I’d encourage you to read their documentation for more detail). For larger requests, however, with data that runs into the millions of observations, you may find it much cheaper to maintain your own text analytics solution.